To make a DIY cardboard mouse trap, you’ll need cardboard sheets (37cm x 10cm for base, two 10cm x 8cm for sides), popsicle sticks, rubber bands, bamboo skewers, and super glue. Create a balanced trigger system using a toothpick that releases when disturbed. Position the bait (peanut butter works best) on a small platform connected to the trigger. Place your assembled trap along walls where you’ve noticed mouse activity. The following tutorial will show you exactly how to transform these simple materials into an effective solution.
Materials You’ll Need for Your Cardboard Mouse Trap

Simplicity is the key to this DIY mouse trap project. You’ll create an effective pest control solution using everyday materials that cost far less than commercial Mouse Traps.
Start by gathering cardboard sheets that you’ll cut to specific dimensions: one piece at 37cm x 10cm and two smaller pieces at 10cm x 8cm.
Begin with precisely cut cardboard: one large piece at 37cm x 10cm and two smaller pieces measuring 10cm x 8cm.
Ice cream sticks are vital for the trigger mechanism, providing the necessary leverage when the mouse approaches the bait. Collect several rubber bands to create tension for the trap’s snapping action.
You’ll also need BBQ bamboo sticks for structural support and stability.
Finally, super glue (502) is essential for securing all components together, ensuring your homemade mouse trap remains intact during operation and effectively contributes to your pest control efforts.
Understanding the Basic Trap Mechanism
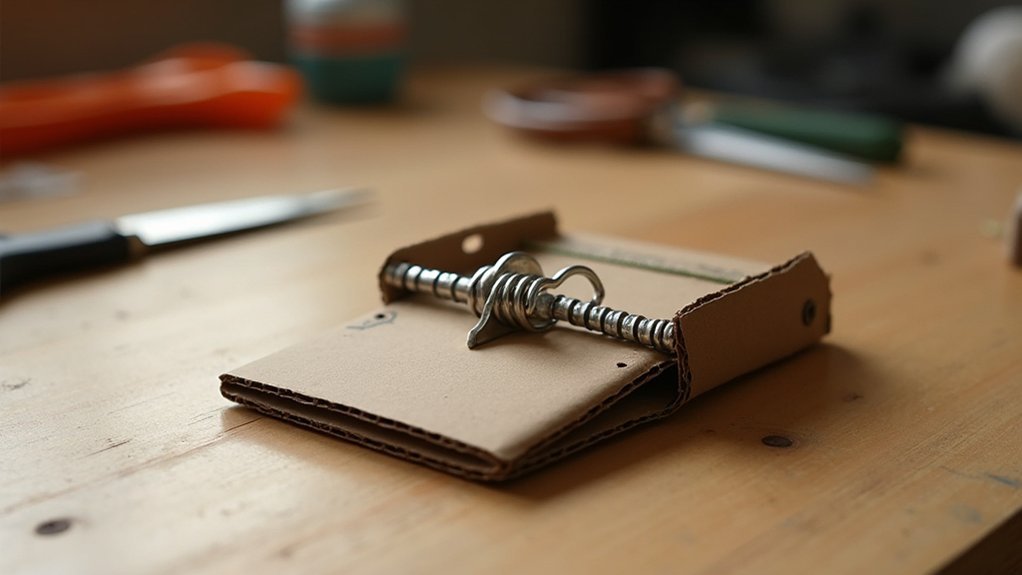
A cardboard mouse trap works through a carefully balanced trigger system that releases when a mouse disturbs the bait stick connected to your trap lid.
You’ll need to create tension using rubber bands that power the spring action, ensuring the trap snaps quickly when triggered.
Position your bait station at the ideal distance from the trigger mechanism, making it irresistible to mice while maintaining the trap’s sensitivity.
Mechanism Core Principles
The fundamental operation behind our DIY cardboard mouse trap relies on a carefully balanced trigger system that activates instantly when a curious rodent disturbs the bait. You’ll need to create a pivot-based mechanism where a support stick balances between the trigger and the trap’s lid.
| Component | Function | Material |
|---|---|---|
| Trigger stick | Connects bait to trap mechanism | Large toothpick |
| Tension element | Provides snapping force | Rubber bands |
| Bait platform | Holds bait and initiates trigger | Small cardboard piece |
When positioning your trap mechanism, guarantee proper alignment of all components. The bait should be placed securely on one end of the trigger stick, while the other end supports the weighted lid. This delicate balance guarantees that when a mouse disturbs the bait, the mechanism instantly collapses, capturing the rodent effectively.
Trigger Spring Action
Building on our balanced trigger system, let’s now examine the spring action that powers our trap. The heart of your DIY mouse trap relies on a properly stretched rubber band that creates tension for the trigger spring action. Secure this rubber band firmly at both ends to guarantee it snaps back effectively when activated.
Connect the top and bottom parts of your trap mechanism using a half-perforated popsicle stick. This linkage enhances the trap’s responsiveness when triggered. Position your bait carefully on the stick—when the mouse pulls on it, the stick should move, instantly activating the trap.
Before deployment, test your mechanism thoroughly to verify smooth operation. A properly constructed trigger spring action will release instantly when disturbed, making your cardboard mouse trap both effective and reliable.
Bait Station Design
Creating an effective bait station forms the cornerstone of your DIY mouse trap success. When designing your bait station, keep in mind that mice are attracted to dark, enclosed spaces with enticing food. Cut a 1-2 inch entrance hole that allows easy access while maintaining the trap’s functionality. Place peanut butter inside as bait—its strong aroma effectively lures mice to your trap.
- Position your trap in areas showing signs of mice, such as droppings or gnaw marks.
- Cover the station with cardboard to create a dark environment mice find appealing.
- Balance your stick mechanism with one end on the bait, the other supporting the lid.
- Confirm the trigger releases when the mouse disturbs the bait.
This design maximizes your chances of catching mice by exploiting their natural behavior and preferences.
Preparing Your Cardboard for Construction
You’ll need to start by measuring and marking a 37cm x 10cm rectangle on your cardboard sheet for the base, along with two 10cm x 8cm pieces for the sides.
Using a ruler, draw precise cutting lines on your cardboard to guarantee your trap components fit together perfectly during assembly.
Once your template is properly marked, cut along your guidelines with sharp scissors or a utility knife to create the foundation pieces of your mouse trap.
Measuring and Marking
The precise preparation of your cardboard is the foundation of a successful mouse trap. Begin by cutting your main cardboard sheet to 37cm x 10cm for the base. Using a ruler, draw clear lines to guide your cutting for each component of the trap’s structure.
Don’t forget to prepare two additional pieces measuring 10cm x 8cm each.
- Always double-check your measurements before making any cuts to avoid wasting materials
- Use straight edges when marking to guarantee clean, precise lines
- Mark the positions where different pieces will connect to streamline assembly
- Consider labeling each piece as you cut it to keep track of what goes where
Clean, accurate measuring and marking will guarantee all components fit together perfectly, creating an effective and functional mouse trap.
Cutting Your Template
With your measurements neatly marked, it’s time to transform your cardboard into the actual trap components. Using a sharp cutting tool, carefully cut along the lines you’ve drawn on your cardboard sheet.
Begin with the main rectangular piece measuring 37cm x 10cm, which will serve as the base of your mouse trap.
Next, cut two additional pieces sized 10cm x 8cm for the side walls. These smaller sections will provide structural support when you assemble the trap.
Make sure all cuts are clean and precise, as jagged edges might compromise the stability of your finished trap.
Keep your cut pieces organized as you work—this will save time during assembly. The rectangular base and two wall pieces form the foundation of your DIY solution, making precision at this stage essential for effectiveness.
Creating the Main Trap Structure
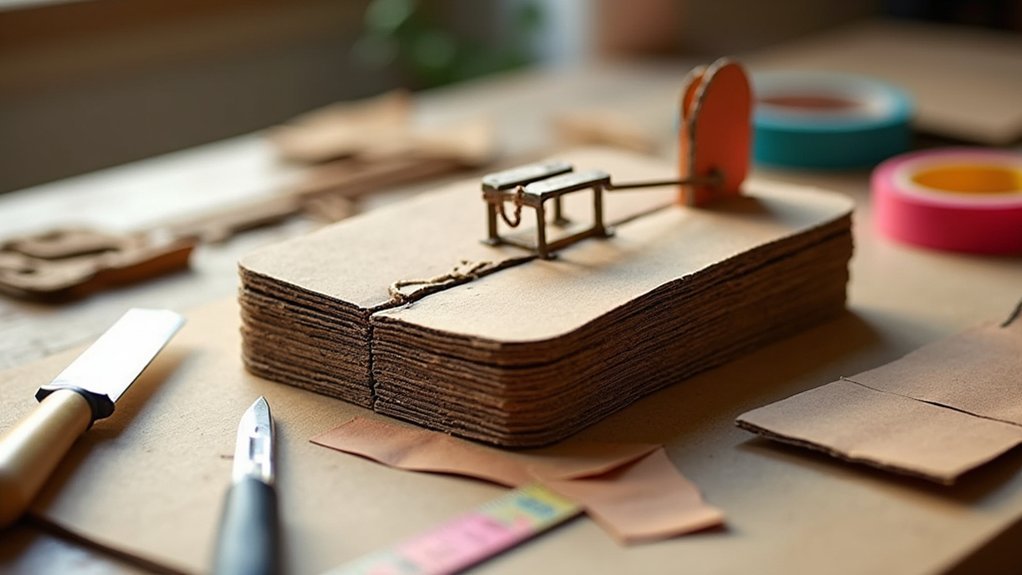
Once you’ve gathered all your materials, building the foundation of your DIY mouse trap begins with preparing the cardboard pieces to precise measurements. Cut your base sheet to 37cm x 10cm, then prepare two side walls at 10cm x 8cm each. The precise dimensions guarantee your trap is large enough to catch mice inside while remaining compact.
Precise measurements create the perfect foundation for your mouse trap—ensuring it’s both functional and space-efficient.
- Attach the side walls to the base using super glue (502), making sure they’re perfectly perpendicular.
- Create an entrance hole (1-2 inches in diameter) on one side to allow mice access.
- Add a cardboard cover on top to create a dark environment mice prefer.
- Double-check all connections to verify the structure is sturdy and won’t collapse.
Remember that mice are cautious creatures, so creating the main trap structure properly with a dark, enclosed space will greatly improve your capture rate.
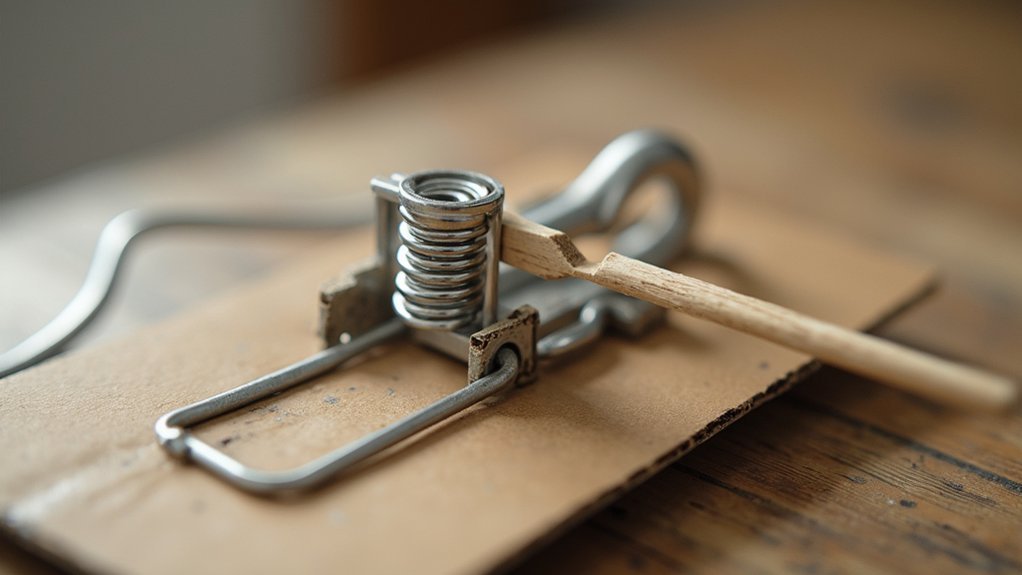
Designing the Trigger Mechanism
After establishing your trap’s foundation, you’ll need a reliable trigger mechanism that responds instantly when a mouse takes the bait.
Begin by creating small holes in your popsicle sticks to connect the top and bottom components securely.
Cut one popsicle stick in half and use it as a linking piece between the upper and lower parts of your trap. This half-stick will serve as the pivoting trigger that activates when disturbed.
Position your ice cream sticks strategically so they’ll collapse when the mouse reaches for the bait.
Fasten a large toothpick into the cardboard base to provide essential support for your trigger mechanism.
Finally, stretch a rubber band from one end to the other – this creates the necessary tension for the quick snap action that will catch the mouse.
Assembling the Spring and Release System
The spring and release system forms the heart of your DIY mouse trap, transforming it from a simple cardboard box into an effective catching device.
To get rid of mice humanely, you’ll need to create a responsive mechanism that snaps quickly when triggered.
- Drill a hole through your perforated popsicle stick and connect it between the top and bottom trap sections to create the pivoting action.
- Stretch a rubber band between both sections to generate the spring action necessary for quick closure.
- Adjust the rubber band tension carefully—it should be sensitive enough to activate with minimal disturbance.
- Install a large toothpick into the cardboard frame as a pivot point for stability—this creates a durable system mice can’t chew through.
Test your mechanism several times before finalizing to guarantee smooth, reliable operation.
Adding the Bait Station Effectively
Creating an irresistible bait station is vital for your cardboard mouse trap’s success. Mice love peanut butter and cheese, so place a small amount of either on a sensitive trigger platform inside your trap.
Don’t overload it—a pea-sized portion is perfect to entice mice to come without making the trigger too heavy.
Position your bait station strategically by securing it to the trigger mechanism where the mouse must interact with it to access the treat.
Place your completed trap along walls or corners where you’ve spotted droppings or gnaw marks, not far away from their regular pathways.
Check your trap daily and refresh the bait every few days if unsuccessful.
Testing Your Trap Before Deployment
Before deploying your new cardboard creation, thoroughly test its functionality to avoid wasted time and escaped mice. Perform multiple trigger tests to guarantee the mechanism operates smoothly without sticking or jamming.
- Place a small weight (like a coin) on the bait area to simulate a mouse’s weight and confirm the trap springs properly when triggered.
- Observe the trap’s action from a safe distance, verifying that it snaps back quickly and securely enough to capture a mouse.
- Check that all components remain firmly attached during operation and that the rubber band maintains adequate tension.
- Conduct a final safety inspection to eliminate any sharp edges or loose parts that could compromise the trap’s effectiveness.
Proper testing guarantees reliable performance when it matters most – when catching actual mice.
Strategic Placement for Maximum Efficiency
Once you’ve constructed and tested your DIY cardboard mouse trap, proper placement becomes essential for successfully catching mice. Position your trap in areas showing evidence of mouse activity, such as droppings or chew marks.
Place your trap along walls or in corners where mice typically travel, as they prefer running alongside boundaries rather than crossing open spaces. Choose dark, quiet locations where mice feel secure enough to investigate your bait.
Avoid setting traps near food sources or in brightly lit areas, as these conditions can make mice wary and less likely to approach.
If you don’t catch anything within a few days, don’t get discouraged—simply relocate your trap to another potential hotspot. Keep monitoring and adjusting placement until you find the sweet spot for catching these elusive pests.
Maintaining and Monitoring Your DIY Trap
After finding the perfect spot for your cardboard mouse trap, regular maintenance and monitoring become the next focus of your pest control efforts.
Check your trap daily to humanely handle any catches and reset it for continued efficiency. Peanut butter works exceptionally well as bait, but you’ll need to refresh it every few days to maintain its enticing aroma.
- Keep the trap covered to create a dark, inviting environment that mice naturally prefer
- Look for telltale signs of mouse activity around the trap like droppings or gnaw marks
- Relocate the trap if you don’t see catches after several days
- Track your catches in a simple log to identify patterns and measure your trap’s effectiveness
Humane Handling and Release Methods
After successfully trapping a mouse in your DIY cardboard trap, you’ll need to handle it carefully by wearing gloves and minimizing sudden movements that might stress the animal.
Transport your captured mouse in a covered container with small air holes, keeping noise and temperature extremes to a minimum during the journey.
When choosing a release location, select a natural area at least a mile from your home that offers shelter and food sources, while ensuring you’re complying with local wildlife regulations.
Safe Capture Techniques
When prioritizing the humane treatment of mice, your approach to capturing and releasing them becomes just as important as the trap design itself.
Choose a cage-style cardboard trap that allows for safe capture without causing injury. This gives you the ability to relocate the mouse without unnecessarily stressing the animal.
- Always wear gloves when checking and handling your trap to prevent transferring your scent and to protect yourself from potential bites.
- Bait your trap with peanut butter—it’s effective at attracting mice and remains secure inside the trap.
- Transport the captured mouse in the closed trap to a release site at least 1-2 miles from your home.
- Select a release location with natural cover and food sources to give the mouse the best chance of survival.
Proper Mouse Transportation
Transporting your captured mouse requires thoughtful preparation to guarantee both your safety and the mouse’s wellbeing. Always use a secure cage trap and keep it upright during transit to prevent stressing or injuring your tiny captive.
When handling the trap, avoid direct contact with the mouse. Wear gloves if you need to adjust anything, as this reduces disease transmission risk. Never attempt to handle the mouse directly.
Before releasing, check your local wildlife regulations, as some areas restrict relocating captured animals.
Choose a release site at least one mile from your home in a natural area with ample food and shelter opportunities. This distance assures the mouse won’t return to your home while giving it the best chance for survival in its new environment.
Ideal Release Locations
Finding an appropriate release site for your captured mouse greatly impacts its survival chances in the wild.
You’ll need to transport your mouse at least 1-2 miles from your home to prevent its return, as mice possess strong homing instincts.
- Look for wooded areas or fields with natural cover where the mouse can find shelter and food sources immediately.
- Release during early morning or evening when predators are less active and temperatures are milder.
- Avoid releasing mice on private property without permission to prevent legal issues and neighborly conflicts.
- Consider seasonal factors – make sure you’re not releasing mice during extreme weather conditions when survival would be difficult.
Always check local wildlife regulations before releasing mice to verify you’re following proper protocols for humane wildlife management.
Troubleshooting Common Trap Issues
Even the most carefully constructed cardboard mouse trap can sometimes fail to perform as expected. If your trap isn’t triggering, first check the rubber band tension—ensure it’s properly stretched and secured at both ends.
Also verify that all popsicle sticks and components are correctly aligned, as even slight misalignment can prevent proper functioning.
When mice aren’t taking the bait, try switching to more enticing options like peanut butter or cheese. Make sure the bait is positioned to encourage mouse interaction with the trigger mechanism.
Regularly inspect your trap for loose parts or damage that might compromise stability and performance.
If several days pass without success, don’t hesitate to relocate your trap to areas with visible mouse activity—look for droppings or gnaw marks indicating high-traffic zones.
Enhancing Your Trap With Eco-Friendly Features
Beyond ensuring your trap functions properly, you can make it environmentally responsible with thoughtful material choices. Your DIY approach already reduces waste by repurposing cardboard packaging, but you can take sustainability even further.
- Replace synthetic adhesives with plant-based glues that break down naturally without harming soil or water systems.
- Incorporate bamboo sticks or collected twigs for the trap mechanism instead of plastic components.
- Choose organic peanut butter as bait, avoiding preservatives and chemicals that might affect other wildlife.
- Decorate with non-toxic, water-based paints or markers if you’re customizing your trap’s appearance.
These eco-friendly modifications won’t compromise your trap’s effectiveness while considerably reducing its environmental footprint.
You’ll create a humane solution that aligns with sustainable living principles.
Frequently Asked Questions
How to Make a Mouse Trap Out of Cardboard?
To make a cardboard mouse trap, you’ll need to cut pieces (37×10cm and two 10×8cm), create entrance/exit holes, and attach ice cream sticks with rubber bands. Add peanut butter as bait where mice frequent.
What Does Peanut Butter Do to Mice?
Peanut butter attracts mice with its strong aroma and high-fat content. You’ll find it’s irresistible to their keen sense of smell. They can’t help investigating it, making it perfect for baiting traps.
What Is the Easiest Homemade Mouse Trap?
The easiest homemade mouse trap you can make is a cardboard box trap. Just cut a hole, place peanut butter inside, and prop the lid with a stick that’ll collapse when a mouse enters.
How to Catch Mice Using a 5 Gallon Bucket?
To catch mice using a 5-gallon bucket, create a ramp, place bait on a tipping platform above, and add a few inches of water. When mice reach for the bait, they’ll fall in and can’t escape.
In Summary
You’ve now mastered building an effective, eco-friendly mouse trap using simple materials from home. Don’t forget to check your trap regularly and release any caught mice at least a quarter-mile from your property. If you’re facing persistent issues, try adjusting the trigger sensitivity or relocating the trap. With this DIY solution, you’re handling pest problems humanely while saving money and reducing waste.


Leave a Reply