
You can build an effective moth light trap tonight using a 20-liter bucket, large household funnel, UV light source (395-400nm), and portable battery pack. Position the funnel in the bucket’s opening, mount your UV bulb above it, and add empty egg boxes inside for moth comfort. Place your trap 3-4 feet high in a dark area away from competing lights, ensuring you’ve got weather protection for electronics. There’s much more to optimizing your setup for maximum success.
Materials You Need for Your Moth Light Trap
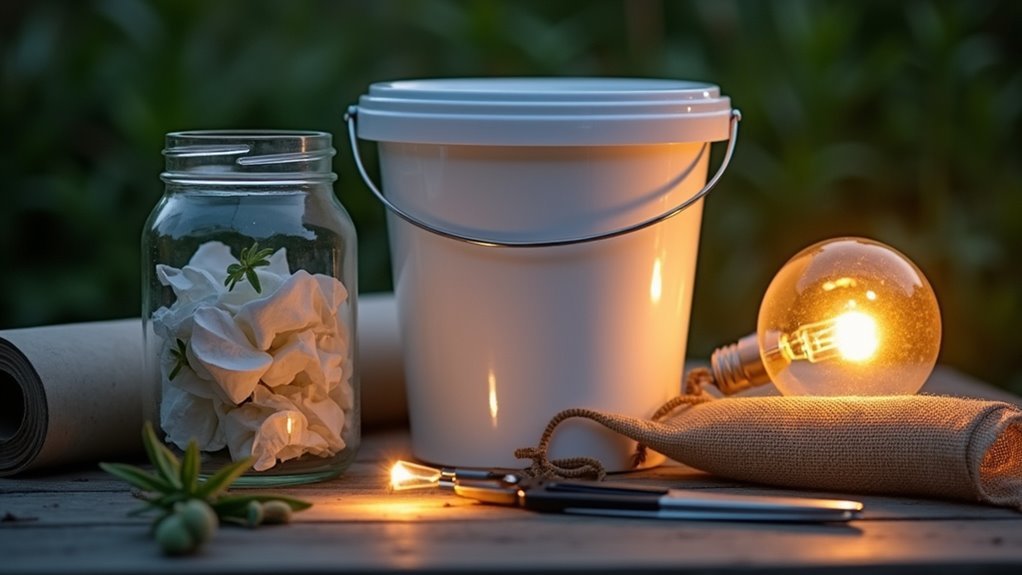
Building an effective moth light trap requires just six essential materials that you likely already have around your home or can easily purchase at a hardware store.
You’ll need a sturdy 20-litre bucket with a tight-fitting lid to contain trapped moths securely. A large household funnel, preferably 215mm or 255mm, guides moths into the bucket while preventing escape.
Place empty egg boxes inside to provide comfortable resting spots for captured moths. The moth light itself should be a 13-watt UVB bulb paired with a compatible ES27 screw fitting bulb holder for secure mounting.
Finally, gather cable ties for securing components and a power source like a USB power bank or battery to operate your trap effectively.
Budget-Friendly Equipment Options
While constructing a professional-grade moth trap might seem expensive, you can build an effective version for just $50 using readily available materials.
These budget-friendly options let you create a functional trap without breaking the bank.
Your shopping list includes:
- 20-litre bucket and plastic kitchen funnel from hardware stores
- 395-400 nm UV LED or 13-20 watt UVB compact fluorescent bulb
- 10,000 mAh battery (or larger) for 6-8 hours of operation
- Egg boxes from your kitchen for moth resting spots
- White sheet to maximize attraction surface area
You’ll save money by sourcing materials from home or local stores rather than purchasing specialized equipment.
The combination of proper lighting and simple collection materials creates an effective moth observation setup that rivals expensive commercial alternatives.
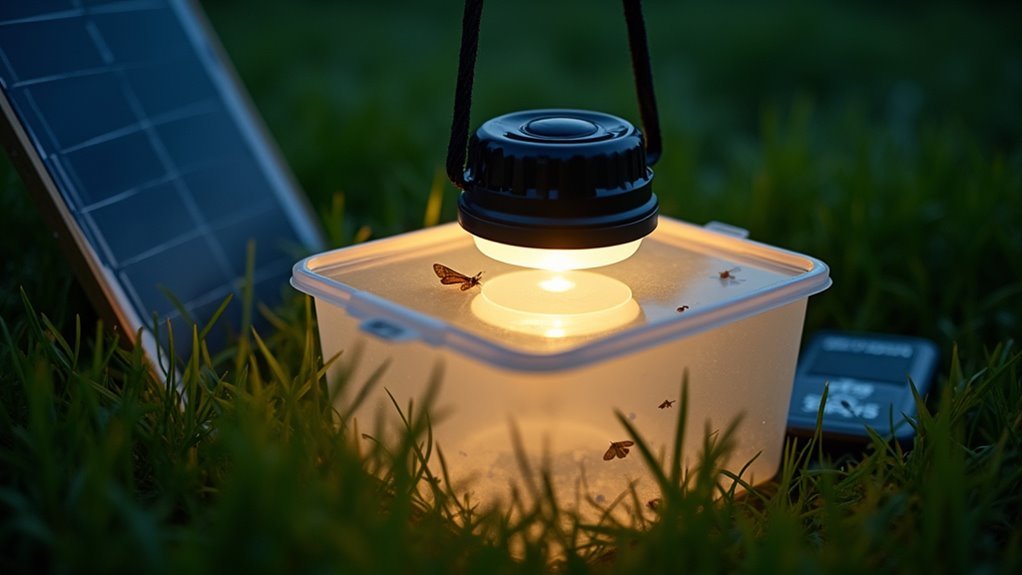
Choosing the Right Light Source for Maximum Attraction

Since moths navigate using celestial light sources, selecting the proper wavelength becomes essential for maximizing your trap’s effectiveness. You’ll want to focus on UV light in the 395-400nm spectrum, as research confirms moths have heightened sensitivity to these wavelengths.
Actinic bulbs outperform standard white lights by attracting a broader range of species. For power efficiency, consider 20-watt compact fluorescent bulbs that balance brightness with energy consumption. LED strips have become increasingly popular alternatives, matching fluorescent performance while offering extended lifespans.
| Light Type | Wavelength | Wattage | Lifespan | Effectiveness |
|---|---|---|---|---|
| Actinic CFL | 395-400nm | 20w | 8,000hrs | High |
| LED Strip | 395-400nm | 15-25w | 25,000hrs | High |
| Standard CFL | Full spectrum | 20w | 8,000hrs | Medium |
| Mercury Vapor | 365nm | 125w | 12,000hrs | Very High |
| Blacklight | 365nm | 15w | 9,000hrs | Medium |
Position your chosen light directly above the funnel opening for ideal moth entry.
Setting Up Your White Sheet Display Area
Beyond selecting your light source, you’ll need a proper display area where moths can land and be easily observed. Your white sheet serves as the perfect backdrop, creating contrast that makes spotting different species easier.
- Find the right location – Choose a flat, open space away from streetlights to minimize light pollution that deters moths.
- Secure your white sheet properly – Hang it using a washing line or attach to a sturdy tree branch for stability.
- Keep it taut and flat – Use pegs or clips to prevent fluttering that could scare away visitors.
- Position lighting strategically – Direct bright lights at the sheet while turning off nearby sources.
- Prepare identification tools – Keep a moth ID book or phone app handy for species identification.
Power Solutions and Battery Recommendations
You’ll need to select the right battery type and calculate proper power capacity to keep your moth trap running through the night.
Lithium batteries offer the best performance for portable setups, while lead-acid options provide budget-friendly alternatives for stationary traps.
Setting up inverter connections properly guarantees your lighting system operates safely and efficiently during extended trapping sessions.
Battery Types Overview
When selecting a power source for your moth light trap, you’ll encounter several battery options that each offer distinct advantages and drawbacks. Understanding this battery types overview helps you choose the right solution for your trapping needs.
Here’s what you need to take into account:
- Lead-acid batteries are budget-friendly but heavy, requiring careful discharge management (never below 50%).
- Lithium batteries provide superior portability and longevity despite higher upfront costs.
- USB power banks offer convenience but need step-up converters for 12v lights.
- Capacity requirements should range 15,000-20,000 mAH for 6-8 hour sessions.
- Weather protection is essential—always seal batteries in zip lock bags.
Choose lithium for mobile setups or lead-acid for stationary traps where weight isn’t critical.
Power Capacity Calculations
Since power consumption directly impacts your trapping success, calculating the right battery capacity requires matching your light’s wattage to your planned operating duration.
For power capacity calculations with LED setups, you’ll need a lithium battery between 15,000-20,000 mAh to achieve 6-8 hours of reliable operation.
If you’re using a 20-watt compact fluorescent bulb, pair it with a 12v inverter for efficient DC-to-AC conversion.
USB power banks work for LED lights, though you might need a step-up converter for 12v requirements.
Remember that lead-acid batteries shouldn’t discharge below 50% to maintain performance.
Always verify your power source’s compatibility with light-sensitive switches and protect all connections from moisture for safe operation.
Inverter Connection Setup
Building on your power calculations, setting up the inverter connection forms the backbone of your moth trap’s electrical system.
You’ll need a 12v inverter that matches your battery voltage and handles your light’s wattage requirements. This critical component converts DC power from your battery into AC power for standard moth lights.
Your inverter connection setup requires careful attention to these key elements:
- Match your inverter’s capacity to your light source’s wattage requirements
- Guarantee proper voltage compatibility between your 12v battery and inverter
- Connect positive and negative terminals securely to prevent power loss
- Position the inverter close to your battery to minimize voltage drop
- Verify all connections are tight before powering on your moth trap
This foundation guarantees reliable operation throughout your nighttime collecting sessions.
Positioning Your Trap for Optimal Results
Five key factors determine whether your moth light trap will successfully attract diverse species or sit empty through the night. You’ll want to position your trap in a dark area away from competing street lights, as light pollution greatly reduces moth attraction. Choose a shaded location that’s sheltered from wind and rain to maintain stable conditions. Position it a few feet above ground where nocturnal moths are most active.
| Factor | Poor Choice | Ideal Choice |
|---|---|---|
| Light Environment | Streetlight nearby | Complete darkness |
| Sun Exposure | Direct sunlight | Shaded location |
| Height | Ground level | 3-4 feet elevated |
| Weather Protection | Exposed area | Wind/rain shelter |
| Timing | Consecutive nights | Days between sessions |
Follow these moth trapping guidelines, and you’ll dramatically increase your success rate while ensuring diverse species observation.
Weather Protection and Setup Considerations
Proper positioning sets the foundation, but weatherproofing your equipment guarantees consistent results across varying conditions.
Weather protection becomes essential when you’re dealing with sensitive electronic components and unpredictable outdoor environments.
- Protect electronics: Place your USB battery in a zip lock bag and wrap plastic around USB cables to maintain moisture resistance.
- Choose sheltered locations: Position your setup away from direct rain and wind exposure to preserve moth activity and trap effectiveness.
- Use rough-textured surfaces: Install a shower curtain liner that helps moths cling even during wet conditions.
- Paint strategically: Apply matte black paint to the funnel’s bottom to reduce light reflections and provide moisture camouflage.
- Verify stability: Double-check your setup’s position before use, as weather can shift components and reduce trapping success.
Safety Precautions When Working With Electrical Components
When you’re setting up electrical components for your moth trap, you’ll need to follow essential safety protocols to protect yourself from shock and fire hazards.
Always install an RCD (Residual Current Device) between your trap and the mains power supply, and never work on live circuits—disconnect power before making any adjustments.
You must also shield all electrical connections from moisture using waterproof coverings and keep components elevated above potential water sources.
Mains Electricity Handling Precautions
Since mains electricity poses serious risks including electrocution and fire hazards, you’ll need to follow essential safety precautions before beginning your moth light trap project. Proper mains electricity handling precautions will protect you from potentially fatal accidents and guarantee your project’s success.
- Always use an RCD – Install a Residual Current Device to protect against electrical shocks and automatically cut power during faults.
- Turn off mains power first – Switch off electricity at the breaker before handling any wires or electrical components.
- Check for live wires before drilling – Verify no electrical components are nearby when creating holes for cable management.
- Protect against moisture – Cover all electrical parts with plastic or waterproof enclosures to prevent short circuits.
- Follow manufacturer instructions – Confirm component compatibility and proper installation to avoid malfunctions.
RCD Protection Requirements
Before connecting any electrical components for your moth light trap, you must install an RCD (Residual Current Device) to safeguard against potentially fatal electrical shocks. This device automatically disconnects your circuit when detecting current imbalances between incoming and outgoing power.
| RCD Requirement | When Needed | Testing Frequency |
|---|---|---|
| Mandatory | Outdoor setups | Monthly |
| Recommended | Damp environments | Monthly |
| Essential | No built-in fuse protection | Monthly |
You’ll need RCD protection especially when operating in outdoor or moist conditions where electrical hazards increase notably. Test your RCD monthly by pressing the test button to verify proper function. Verify all electrical connections remain secure and well-insulated to prevent moisture intrusion that compromises RCD effectiveness. Check local electrical safety regulations for compliance requirements during your moth trapping activities.
Moisture Prevention Strategies
Although electrical safety forms the foundation of your moth trap setup, moisture presents the greatest ongoing threat to both functionality and safety.
Implementing effective moisture prevention strategies will protect your investment and guarantee consistent operation throughout varying weather conditions.
Your trap needs robust protection against water infiltration:
- Create a weather shield – Cut a plastic drinks bottle to cover the bulb, allowing light emission while blocking rain and humidity.
- Install drainage holes – Drill 6mm or 8mm holes around the bucket’s base to prevent water accumulation.
- Waterproof electrical connections – Store batteries and wiring in zip lock bags during bad weather.
- Insulate all components – Make sure bulb holders and cables have proper moisture-resistant insulation.
- Schedule regular inspections – Check for wear and moisture damage, replacing compromised parts immediately.
Understanding Moth Behavior and Activity Patterns
When you’re setting up a moth light trap, timing becomes your most critical factor for success. You’ll want to operate your trap during peak hours between midnight and 2 AM when moths are most active.
Choose warm, humid nights during warmer months for the best results, as weather conditions directly impact moth diversity and activity levels.
Your light selection matters considerably. Moths navigate using celestial bodies, so artificial lights disrupt their natural behavior and draw them toward your trap.
UV light proves particularly effective at attracting various species, though different moths prefer specific wavelengths.
Remember that location affects your catch—Scotland alone hosts over 1,300 common moth species, so your local habitat will determine which fascinating creatures you’ll discover.
Best Times and Conditions for Moth Trapping
Building on these fundamental principles, you’ll maximize your trapping success by understanding the specific environmental conditions that trigger peak moth activity.
Your moth traps will perform best when you consider these critical timing and environmental factors:
- Set up during warm, humid nights – Moths are most active between midnight and 2 AM when temperatures remain comfortable.
- Choose calm, clear weather – Avoid windy or rainy nights that reduce moth flight activity.
- Position traps away from streetlights – Dark areas free from competing artificial lighting sources attract more species.
- Target late spring and summer months – These seasons offer the highest diversity and numbers of active moths.
- Check traps every morning – Regular monitoring captures late-night arrivals that other collection methods might miss.
Observing and Documenting Your Catches
Once you’ve successfully attracted moths to your trap, proper observation and documentation transforms a simple collecting activity into valuable scientific contribution. Recording moths is a fun and rewarding way to participate in citizen science while building your naturalist skills.
Document essential details in your notebook or iNaturalist app. Record the date, time, and weather conditions for each trapping session to identify activity patterns. Take clear photographs focusing on wing patterns, colors, and distinctive markings that’ll help with accurate identification later.
| Documentation Element | Purpose |
|---|---|
| Date/Time/Weather | Track activity patterns |
| Species characteristics | Aid identification |
| Clear photographs | Reference for later study |
| Release location | Minimize habitat disruption |
After observing, gently release moths back into their habitat. Share your findings with local naturalist groups to contribute valuable biodiversity data.
Identifying Common Moth Species
You’ll find that identifying moths becomes easier when you focus on three key characteristics: their distinctive wing patterns, overall size and coloration, and when they’re most active during different seasons.
Start by examining the wing markings closely—burnet moths display bold black and red patterns, while tiger moths showcase striking geometric designs that make identification straightforward.
Pay attention to both the moth’s physical dimensions and the time of year you’re observing, as many species have specific seasonal activity periods that can narrow down your identification options considerably.
Wing Pattern Recognition
When you’re standing before a moth light trap on a warm evening, the sheer variety of wing patterns that emerges from the darkness can feel overwhelming—but learning to recognize key features will transform confusion into confident identification.
Start by focusing on the most distinctive moths first. Burnet moths display striking black and red wings that make them unmistakable, while tiger moths showcase bold, contrasting patterns.
Many species use camouflage, resembling tree bark or leaves, so look closely for subtle markings that distinguish one species from another.
- Color combinations – Note primary and secondary colors, especially striking contrasts
- Pattern shapes – Look for stripes, spots, bands, or geometric designs
- Wing texture – Observe whether wings appear smooth, fuzzy, or scaled
- Size relationships – Compare forewings to hindwings proportionally
- Edge details – Check wing borders for scalloping, fringes, or unique outlines
Size and Color
Size serves as your first filter when identifying moths at a light trap, creating natural categories that narrow down possibilities before you even examine intricate details.
You’ll quickly notice the dramatic range—from tiny 5mm pygmy moths to impressive Large Yellow Underwings spanning 50mm. Use light traps to attract moths effectively, then sort them by wingspan first.
Color patterns provide your second identification layer.
You’ll spot dull brown species using camouflage strategies alongside striking specimens like red-and-black Burnet moths or boldly patterned Tiger moths. Many brown-toned moths blend seamlessly with tree bark, while vibrant colors often signal toxicity to predators.
Night observation enhances your identification success since moths become more active under artificial lighting, displaying their true colors and size distinctions clearly.
Seasonal Activity Periods
Understanding seasonal timing transforms your moth trapping from random encounters into targeted expeditions.
Different moth species emerge throughout the year, making seasonal activity periods essential for successful identification. You’ll maximize your trapping effectiveness by aligning your efforts with natural emergence cycles.
- Spring (March-May): Early emergers like common quakers and Hebrew characters become active as temperatures rise.
- Summer (June-August): Peak diversity with tiger moths, burnet moths, and countless micromoths filling warm nights.
- Autumn (September-November): Late-season species including winter moths and brick moths appear before dormancy.
- Winter (December-February): Limited activity with hardy species like winter moth and mottled umber braving cold nights.
- Year-round opportunities: Some species remain active during mild spells, rewarding persistent trappers.
Maintenance and Storage of Your Equipment
Although your moth light trap will serve you well during countless collecting sessions, its longevity depends entirely on how you maintain and store it between uses.
After each session, thoroughly clean your bucket and funnel to remove debris and dead moths, preparing it for next time. Store light bulbs and electrical components in a dry, cool location away from moisture and temperature extremes.
Protect your investment by using a storage case or bag to prevent accidental damage and keep components organized.
Inspect power cables and connections regularly for wear, replacing damaged parts immediately to guarantee safe operation.
If you’re using batteries, store them in cool, dry conditions and monitor charge levels consistently to assure peak performance during your next moth collecting adventure.
Conservation Benefits of Catch-and-Release Methods
When you practice catch-and-release methods with your moth light trap, you’re minimizing disruption to local ecosystems while allowing moths to continue their essential roles as pollinators and food sources.
You’ll contribute valuable data to population monitoring efforts that help scientists track moth diversity and abundance over time.
Your gentle approach guarantees that even rare or declining species can be documented without removing them permanently from their natural habitats.
Minimal Ecosystem Disruption
Since moths serve as essential pollinators and food sources throughout ecosystems, catch-and-release trapping methods offer researchers and enthusiasts a way to study these insects without permanently removing them from their natural habitats.
When you use catch-and-release techniques, you’re actively supporting local biodiversity while gathering valuable research data.
Your trapping efforts create minimal ecosystem disruption through several key benefits:
- Preserves pollination networks – Released moths continue their crucial role in plant reproduction cycles.
- Maintains food web stability – Birds and other predators retain their fundamental food sources.
- Supports population monitoring – You’ll contribute data on environmental health without harming populations.
- Protects moth diversity – Species variety remains intact for future generations.
- Encourages conservation awareness – Direct interaction fosters deeper appreciation for these significant creatures.
Supporting Population Monitoring
By documenting every moth you capture and release, you’re contributing essential data that helps scientists track population trends across different species and regions. Your observations become part of larger datasets that reveal how climate change and habitat loss affect moth biodiversity.
| Recording Method | Conservation Impact |
|---|---|
| Photo documentation | Species identification verification |
| Location tracking | Range distribution mapping |
| Abundance counts | Population trend analysis |
When you use light traps to attract moths and participate in citizen science programs like Moths by Month, you’re providing standardized data that informs conservation strategies. Moths serve as ecosystem health indicators, revealing environmental changes through their population fluctuations. Your catch-and-release efforts help researchers understand pollination networks and food web dynamics, making every documentation session a meaningful contribution to moth conservation efforts.
Frequently Asked Questions
How to Make a Light Trap for Moths?
You’ll need a 20-litre bucket, funnel, and UVB light bulb. Cut a hole in the bucket’s lid, insert the funnel, paint it black, mount the light above, and place in darkness.
What Is the Best DIY Moth Trap?
You’ll get excellent results with a 20-litre bucket, funnel, and 395-400nm UV light positioned above. Add empty egg boxes inside for resting spots. It costs around $50 and catches moths effectively.
What Draws Moths to Light?
You’ll find moths drawn to light because they use natural light sources like the moon for navigation. They’re especially attracted to UV wavelengths and exhibit positive phototaxis, instinctively moving toward bright sources.
How Do You Make Homemade Pheromone Moth Traps?
Cut a plastic bottle’s top off and invert it inside. Place pheromone lures and sticky traps at the bottom. Position your trap near gardens or foliage where moths gather, replacing lures regularly.
In Summary
You’ve got everything you need to start moth watching tonight. Set up your trap, document what you find, and release your catches unharmed. You’ll be amazed at the diversity that visits your light. Keep practicing your identification skills and maintaining your equipment properly. Your simple setup contributes to citizen science while connecting you with the incredible nocturnal world that’s been hiding in your backyard all along.


Leave a Reply